![]()
Welcome to the std book! This book is intended to serve as a companion
to the documentation. The primary difference between the two is that
this book serves as a walk-through for configuring a std environment using an
example Rust project. At the end of this book, you'll have a completely
stdized project utilizing all of the main benefits offered by the std
framework.
How this book is organized
This book is broken up into several chapters. Each chapter tackles a big idea
from std while building on the work done in the previous chapters. As such,
the book is intended to be read from start to finish; however, each chapter is
written in a way that can still be useful as a quick reference.
Since std is a Nix framework and is intended to be used to organize code
repositories, it makes sense to work through applying it to an example project.
In this book, we're using a very basic Rust project, for which the source code
can be found here. Before diving into the book, it's recommended that
you clone the repository locally:
git clone https://github.com/jmgilman/std-book/
cd std-book/rust  # <--- We'll be adding our nix files here
Throughout the book, we'll be building out an environment that uses the above example project. The final source code for the completed example project can be found here.
Assumptions
There are a few assumptions about the reader of this book:
- The reader is already familiar with Nix. While all code snippets will be clearly explained, none of the explanations will be focused on language constructs.
- The reader has experience working with Nix flakes.
- The reader has general experience working within a code repository, including the common tasks and processes that occur within.
It's worth noting that you do not need experience with the Rust language. The usage of Rust is for example purposes only.
Introduction
The std (short for standard) framework is an opinionated Nix
flakes framework that aims to solve the problem of complexity that
often arises in large Nix-based projects. It's opinionated because it prescribes
a standard, flake-based structure for repositories using Nix. It eliminates the
question of how Nix code should be organized and ultimately serves as a boon
for productivity.
In this chapter, we will briefly introduce the framework as a whole. As a
reminder, this book will be starting off with an example Rust project
and then slowly integrating the std framework into it. It's recommended you
clone the repository locally and follow along with the book for the best
learning experience.
The Rust project is intentionally barebones as it's not the primary focus of the
book. As a quick overview, the project produces a single binary that takes one
argument and uses it to print a string in the format of, Hello, <arg>!. It
contains a single unit test that confirms the above logic works as expected.
Why Std?
std aims to provide a rigid framework for organizing Nix code in a repository.
Why is this even necessary? The primary reason is that, because Nix can more or
less do anything, it tends to become progressively less organized the more lines
of it you add to your repository. While flakes helped to bring some organization
to the entry point of a Nix environment, it also disrupted it in other ways
(i.e., what to do with system). In the case of a monorepo, this nature can
quickly become crippling and often results in all sorts of unique "frameworks"
being developed by each team to address it.
For these reasons, std was developed to help reign in large Nix codebases.
However, it's not only for large projects. As we'll see in this article, it can
be used in projects of any size and will naturally grow along with them. Indeed,
this is the preferred approach because it tackles the complexity before it has a
chance to grow too unwieldy.
Std Organization
%%{ init : { "flowchart" : { "curve" : "linear" }}}%%

flowchart TD
    repository(Repository)
    cell1(Cell)
    cell2(Cell)
    cellblock1(Cell Block)
    cellblock2(Cell Block)
    cellblock3(Cell Block)
    cellblock4(Cell Block)
    repository --> cell1
    repository --> cell2
    cell1 --> cellblock1
    cell1 --> cellblock2
    cell2 --> cellblock3
    cell2 --> cellblock4
The std framework is broken up into three organizational levels:
- Repository: This might seem like a given, but the repository serves as the highest level of organization within std. One could consider it an organism made up of one or more cells.
- Cell: The largest organizational unit, a cell typically encompasses a single component of a repository. In a monorepo, there could be one cell per service/binary in the repository. An entire cell could be dedicated to the automation within a repository for smaller projects.
- Cell block: A cell block is a subcomponent of a cell and serves to further subdivide a cell into smaller components. In particular, cell blocks are typed, meaning each falls within a category that defines the functionality the cell block provides. The meaning of this will become more apparent later on.
It's worth noting that cell blocks were previously referred to as organelles, and cell block types were referred to as clades. These have recently changed to ease adoption.
While the presence of cells and cell blocks helps to define an organizational framework, at the same time, the ambiguity as to how cells should be organized provides a necessary degree of flexibility. In this book, we'll give a sample cell structure for our project, but the method proposed here is by no means the best one for every project.
A std Flake
The starting point for integrating std with our example project is defining a
flake.nix file at the root of our project. As mentioned previously, std is a
flake-based framework, and usage of Nix flakes is not optional.
Throughout this book, we'll be sharing snippets of our growing integration. These snippets will make excessive use of localized comments to explain concepts, as the proximity of these tends to make explanations much more effective. As our code base grows, repeat code will have comments stripped and only the new additions will be commented.
If you haven't already done so, clone the repository and move into
the rust subdirectory where our source files are. Create a flake.nix file as
shown in the next section.
Our std Flake
{
  # Like any flake, we define a set of inputs that should be accessible to our
  # project. Here, we include the `std` library and the latest version of
  # nixpkgs.
  inputs.std.url = "github:divnix/std";
  inputs.nixpkgs.url = "nixpkgs";

  # As per the flake schema, we define an attribute for holding the outputs of
  # our flake. In this case, `std` will be responsible for managing the outputs.
  outputs = { std, ... } @ inputs:
    # The `growOn` function can be seen as the main entrypoint into `std`. It is
    # responsible for growing our "organism" through cells into the final
    # product. It will produce an output schema that is specific to `std` and
    # can be further explored through the `std` CLI/TUI.
    #
    # The `growOn` function is similar to `grow` but allows us to expand our
    # flake outputs to include more than just what `std` generates by default.
    # It takes a variable number of attribute sets after the first one which
    # defines how it behaves and will recursively update them into one final
    # set. Without this, we would only be able to use the `std` CLI/TUI, as by
    # default `std` places outputs under the `__std` attribute which the nix CLI
    # knows nothing about.
    std.growOn
      {
        # Necessary for `std` to perform its magic.
        inherit inputs;

        # This is one of the most important arguments for the `grow` function.
        # It defines the path where `std` will search for our cells. In this
        # case, we're specifying the `nix` subdirectory. A cell, in this case,
        # would be defined in a subdirectory under `nix` (e.g. ./nix/cell).
        cellsFrom = ./nix;

        # This is the second most important argument for the `grow` function. It
        # informs `std` of the block types that exist within our cells and where
        # they can be found. In this case, we're specifying that we have
        # "runnable" block types that can be found in an `apps.nix` file under
        # the cell directory.
        #
        # The `std` framework has many different block types, and they primarily
        # dictate how the `std` CLI/TUI will behave. For example, the `runnable`
        # type will allow us to run our cell block as an executable using:
        #
        # > std //std-example/apps/default:run
        #
        # The `run` action is available because we've specified the `runnable`
        # cell block type. In this case, we're running the `default` target
        # which is defined as a derivation in ./nix/std-example/apps.nix that
        # builds our binary.
        cellBlocks = [
          (std.blockTypes.runnables "apps")
        ];
      }
      # This second argument, as described above, allows us to expand what gets
      # included in our flake output. In this case, we're using the built-in
      # `harvest` function to "harvest" the derivations from our apps cell
      # block into the `packages` attribute of our flake output. This allows us
      # to interact with our flake using the nix CLI. For example, we can run
      #
      # > nix run .#default
      #
      # Which will build and run our binary.
      {
        packages = std.harvest inputs.self [ [ "example" "apps" ] ];
      };
}
Much of the structure presented above should not be surprising as there is no
major deviation from the expected flake schema. Perhaps the
largest change occurs in that this structure is primarily generated by std
through the grow-on function. The arguments for this function are
where we primarily derive the structure we discussed in the
previous chapter. Of note are the following:
cellsFrom: The cells that make up our organism must be defined in a single folder within our repository. It's idiomatic to name this folder eithercellsornix. Within this directory, each cell is isolated into a subdirectory, with all of its cell blocks further nested under this subdirectory.cellBlock: Each cell consists of one or more blocks which are defined here in list form. Recall that cell blocks are typed, and the general format for defining them is(std.blockTypes.<type> "<name>"); where<type>is a valid block type as defined here and<name>is wherestdshould look for the cell block under the parent cell's folder.
With these two arguments, we can bring cohesion to our otherwise disunified Nix
code. We know where cells are defined, what block types are available, and where
to find them. Determining where our runnables exist is simply a matter of
examining our flake.nix and following the paths accordingly.
The growOn function takes a variable number of additional arguments and is
what differentiates it from its sibling function (grow). We will dive
deeper into these additional arguments in a future chapter.
Our First Cell Block
The flake, by itself, is not sufficient for a working example. We've told std
that our cells have runnable blocks, yet we've neither created the cell nor
defined any blocks.
To resolve this, we'll create a new file: ./nix/example/apps.nix.
./nix/: Defined in ourcellsFromargument in theflake.nixexample/: The name of our cell.apps.nix: The name of our cell block.
Hopefully, the std structure is starting to become natural now. Here are the
contents of our file:
# A common `std` idiom is to place all buildables for a cell in a `apps.nix`
# cell block. This is not required, and you can name this cell block anything
# that makes sense for your project.
#
# This cell block is used to define how our example application is built.
# Ultimately, this means it produces a nix derivation that, when evalulated,
# produces our binary.

# The function arguments shown here are universal to all cell blocks. We are
# provided with the inputs from our flake and a `cell` attribute which refers
# to the parent cell this block falls under. Note that the inputs are
# "desystematized" and are not in the same format as the `inputs` attribute in
# the flake. This is a key benefit afforded by `std`.
{ inputs
, cell
}:
let
  # The `inputs` attribute allows us to access all of our flake inputs.
  inherit (inputs) nixpkgs std;

  # This is a common idiom for combining lib with builtins.
  l = nixpkgs.lib // builtins;
in
{
  # We can think of this attribute set as what would normally be contained under
  # `outputs.packages` in our flake.nix. In this case, we're defining a default
  # package which contains a derivation for building our binary.
  default = with inputs.nixpkgs; rustPlatform.buildRustPackage {
    pname = "example";
    version = "0.1.0";

    # `std` includes some useful helper functions, one of which is `incl` which
    # handles filtering out unwanted files from our package src. The benefit
    # here is it reduces unecessary builds by limiting the input files of our
    # derivation to only those that are needed to build it.
    src = std.incl (inputs.self) [
      (inputs.self + /Cargo.toml)
      (inputs.self + /Cargo.lock)
      (inputs.self + /src)
    ];
    cargoLock = {
      lockFile = inputs.self + "/Cargo.lock";
    };

    meta = {
      description = "An example Rust binary which greets the user";
    };
  };
}
Standardized Arguments
One of the major benefits of std can be seen in the first few lines of Nix
code. As is fairly typical with Nix, the file serves as one large function;
however, the significance of the argument structure can be easily overlooked.
This structure can be viewed as the standardized form of all cell blocks. From
these two arguments, it's possible to derive all values required to perform
our logic.
Again, this cannot be overstated: we define the arguments the same way each time
and are guaranteed access to all of the tools and data required to perform our
logic. Historically, passing around information in Nix has been a major pain
point. The further down the rabbit hole we go, the more difficult it is to bring
the required information to perform the tasks at the bottom. We can visualize
the benefit std brings here with a small table:
| type | inputs | cell | inputs.cells |
|---|---|---|---|
| packages | inputs.nixpkgs | cell.runnables | inputs.cells.*.runnable |
| functions | inputs.nixpkgs.lib | cell.functions | inputs.cells.*.functions |
| ... | inputs.* | cell.* | inputs.cells.*.* |
With this structure, we can access all of our flake inputs (including
nixpkgs), all local cell blocks, and even cell blocks from sibling cells. No
matter how large our project grows, the same pattern for traversing it will be
maintained.
Standardized Package Definitions
The remainder of the file should look familiar to those attuned to Nix. It's nothing more than an attribute set where the name is a package name and the value is a derivation. This section, of course, benefits from our standardized arguments because we can easily access everything we need to build a proper derivation for our Rust binary.
In addition to the above, std also ships with some useful helper functions for
performing standard Nix operations. In our example, we utilize std.include to
filter out the source files for our project. Since derivations are hashed based
on their inputs, limiting inputs is the best practice to maximize cache usage
and avoid the unnecessary rebuilding of our binary.
Growing
It's important to take a small detour at this point and explore the
std.grow/std.growOn functions in detail. In particular, it helps to inspect
the output of our flake to better understand what it is that these grow
functions are generating.
If we refer back to our flake, we will recall that we
used the growOn function for generating the flake output. Let's assume for a
second that we instead chose to use the std.grow function. If we were to
inspect our flake output at this point, we would see something similar to this:
$ nix flake show
git+file:///Users/josh/code/std-book-example
├───__std: unknown
├───aarch64-darwin: unknown
├───aarch64-linux: unknown
├───x86_64-darwin: unknown
└───x86_64-linux: unknown
This looks strange at first; what is under __std? This attribute is generated
by the grow functions and is referred to as the registry. It houses a plethora
of information about our standardized environment, and you can inspect what's
under here by running:
nix eval --json .#__std | jq
The output is large, so it will be omitted here, but essentially it describes our entire environment, including what cells we have, the blocks (and their types) of those cells, what actions we can run on the blocks, etc. The benefit here is that it provides a layer by which external tools can utilize the information gathered about our environment.
What about all the unknowns? There is data here, but it's important to
understand that it doesn't conform to the expected flake output schema, so
nix flake show just marks it as "unknown." Again, we can see the structure by
going into the Nix REPL environment:
$ nix repl
Welcome to Nix 2.10.3. Type :? for help.

nix-repl> :lf .
Added 18 variables.

nix-repl> :p aarch64-darwin
{ std-example = { apps = { default = «derivation /nix/store/rb7jvsds8wxcrxzfz8cc7jpgqsxch8w1-std-example-0.1.0.drv»; }; }; }
In other words, we could run our binary using:
$ nix run .#aarch64-darwin.std-example.apps.default world
Hello, world!
However, this isn't very intuitive, and this is why the growOn function
becomes helpful. It allows us to add a compatibility layer by transforming the
above structure into something that the Nix CLI can more easily understand. In
our case, if we run the same nix flake show command with the growOn
function, we see:
$ nix flake show
git+file:///Users/josh/code/std-book-example
├───__functor: unknown
├───__std: unknown
├───aarch64-darwin: unknown
├───aarch64-linux: unknown
├───packages
│   ├───aarch64-darwin
│   │   └───default: package 'example-0.1.0'
│   ├───aarch64-linux
│   │   └───default: package 'example-0.1.0'
│   ├───x86_64-darwin
│   │   └───default: package 'example-0.1.0'
│   └───x86_64-linux
│       └───default: package 'example-0.1.0'
├───x86_64-darwin: unknown
└───x86_64-linux: unknown
This now allows us to run our binary using:
$ nix run .#default world
Hello, world!
The std TUI
There's one final thing we have gained from our work so far. The std framework
ships with a binary that adds a terminal user interface (TUI) to our project.
The quickest way to experiment with it is to enter a nix-shell with the
package installed:
nix shell github:divnix/std
With the std binary now available, we can open the TUI with:
std
For our example repository, we're met with:
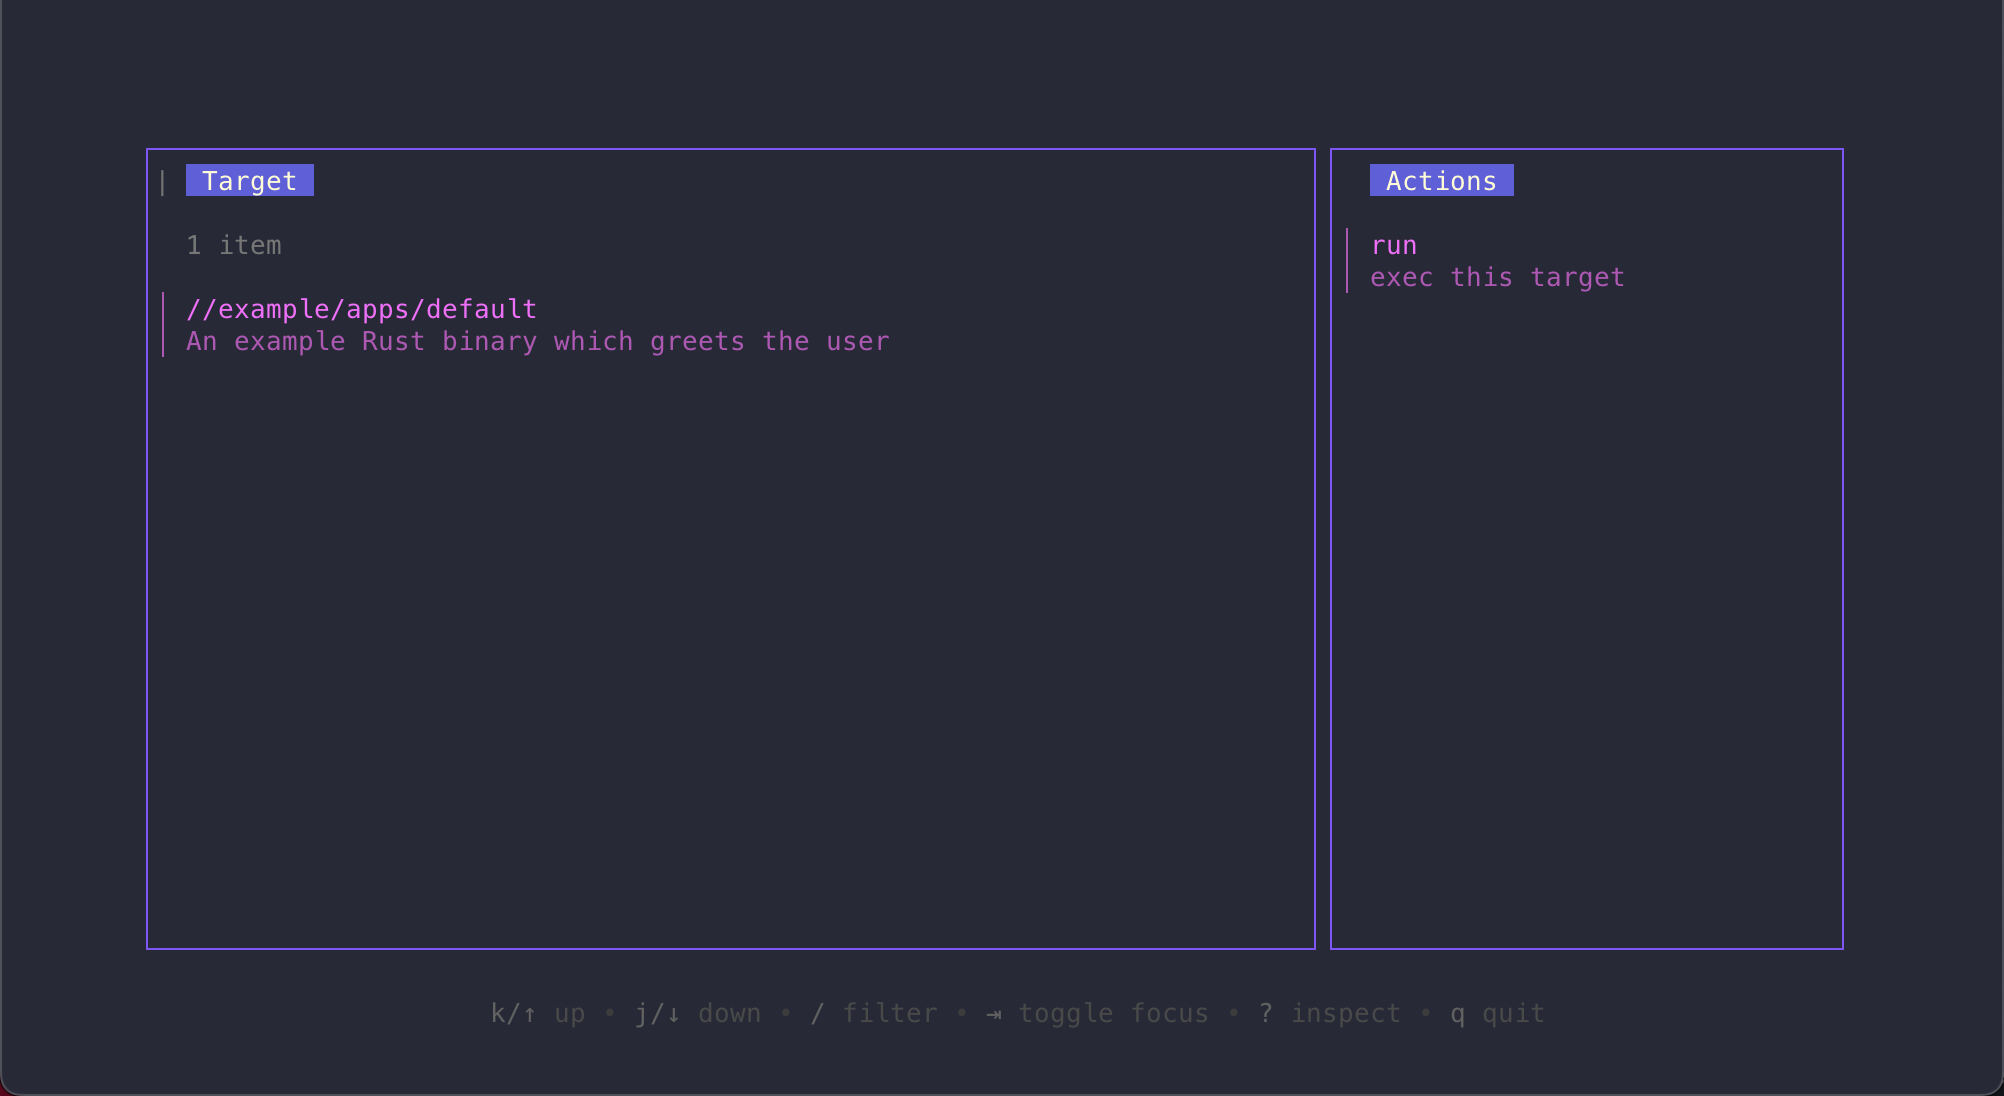
What we're seeing here is a graphical view of our project. In this case, we have
a single binary located at //example/apps/default which can be run. How does
std know this? Recall that we informed std that we have runnables located
in apps.nix. When std analyzes our repository, it automatically found the
runnable for our example Rust project and is showing us what we can do with it
(i.e., run it).
This may seem trivial, but that's only because our repository is small. The usefulness of the TUI grows in proportion to the size of our project. As we add more and more pieces to it, the TUI begins to become an entry point for contributors to explore our repository.
In addition to the TUI, the std binary has a CLI counterpart that will show
the structure of the repository:
$ std list
//example/apps/default:run    --    An example Rust binary which greets the user:  exec this target
If we wanted to run our binary, we'd use:
std //example/apps/default:run
Review
Before we continue into more advanced subjects, let's stop for a moment and
review. What have we gained here? First of all, we have standardized where our
binary builds are defined for our repository: /nix/example/apps.nix. If we
want to add additional builds (i.e., a debug binary), we know exactly where to
put it. As a bonus, we don't even need to worry about the system fiasco that
flakes are often criticized for.
Secondly, we have standardized what most of our Nix code "looks" like. The
{inputs, cell} format is deceptively powerful. One of the most significant
sources of complexity in large Nix codebases stems from the question, "How do I
access everything?" In our case:
- Inputs can be accessed via
inputs - Anything within our local cell can be accessed via
cell - Other cells can be accessed via
inputs.cells
Meaning that as long as we adhere to the organizational principles being applied
with std, we don't have to worry about figuring out where to put things and
how to access them.
Managing Development Shells (devshells)
In the remaining chapters of this book, we're going to begin improving the
foundation we laid in the previous chapter. We've already gained a lot by
integrating std into our example Rust project, but there remains significant
room for improvement.
So far, we've seen that std has a lot to offer in terms of bringing
organization to our Nix-infused repositories. In addition to organization, std
also brings with it many quality-of-life improvements. We're going to
investigate the first one in this chapter: development shells.
Works on My Machine
At the risk of beating a dead horse, this section will be a brief review of why development shells are needed and the benefits they provide to almost any project. Perhaps the most iconic words used to address this issue are:
Works on my machine!
Indeed, this single line has led to a plethora of innovations to address the lack of reproducibility that has defined the last decade of software. Many technologies have risen to tackle the issue, but Nix stands as one of the oldest technologies aimed specifically at tackling this problem.
The main solution Nix employs to tackle reproducible development environments is
nix-shell. We used this command in the last chapter to quickly enter a shell
environment that had the std binary available. This command has further been
refined by receiving support in the official flake schema. With
flakes, it's now possible to define an entire reproducible development shell
which will include all necessary tools to work on a given project. The idea is
simple: if you want to contribute to a project, load up the development shell
and start making changes. The net result is a dramatic reduction in
system-dependent problems and a smoother contribution experience for a project.
Devshell
The wonderful individuals at numtide have taken the idea of development shells and accelerated productivity even further. The numtide/devshell project builds upon flake-based development shells by adding several quality-of-life features that further improve upon a developer's experience. These can be roughly summarized as follows:
- MOTD: A custom message of the day can be configured that appears when a user first enters the development shell. This can be useful for introducing users to a project and giving some basic instructions for getting started with contributions.
- Custom commands: Repository-specific commands can be configured to bring
uniformity to contributors. For example, a
fmtcommand can be defined which runs the formatter(s) the same way they may be run in CI. - Menu: A repository-specific menu can be created that is accessed by running
menufrom the command-line. The contents of this menu are customizable and can include custom commands or other binaries that are available in the environment. - Package management: package management is made significantly easier by
allowing packages to be specified in several different locations. For example,
a custom command could be dependent on a package being available in the
environment and
devshellwill handle the dependency for you automatically.
The std framework provides native support for integrating devshell into our
standardized project. All that's required is a little bit of configuration on
our end and we'll be able to provide a rich development shell for contributors
to use with our example Rust project.
Adding the Devshell Block
As we begin iterating on our project, we'll come across this common theme: to
add new functionality to our project, simply add new cell blocks. In the case of
devshell, this remains true: to begin, we'll add a new block to our
flake.nix:
{
  inputs.std.url = "github:divnix/std";
  inputs.nixpkgs.url = "nixpkgs";
  inputs.rust-overlay.url = "github:oxalica/rust-overlay";

  outputs = { std, ... } @ inputs:
    std.growOn
      {
        inherit inputs;
        cellsFrom = ./nix;
        cellBlocks = [
          (std.blockTypes.runnables "apps")

          # The `devshell` type will allow us to have "development shells"
          # available. These are managed by `numtide/devshell`.
          # See: https://github.com/numtide/devshell
          (std.blockTypes.devshells "devshells")

          # The `function` type is a generic block type that allows us to define
          # some common Nix code that can be used in other cells. In this case,
          # we're defining a toolchain cell block that will contain derivations
          # for the Rust toolchain.
          (std.blockTypes.functions "toolchain")
        ];
      }
      {
        packages = std.harvest inputs.self [ "example" "apps" ];

        # We want to export our development shells so that the following works
        # as expected:
        #
        # > nix develop
        #
        # Or, we can put the following in a .envrc:
        #
        # use flake
        devShells = std.harvest inputs.self [ "example" "devshells" ];
      };
}
The first thing to notice is we've added a new input for the rust-overlay
flake. This flake provides an overlay attribute that we can overlay on top of
nixpkgs to enable fetching specific versions of the Rust
toolchain. We'll use this below in our toolchain cell block
to make fetching the latest version of the toolchain trivial.
We've added two new cell blocks above: one of the devshells type and the other
of the functions type. Our development shells will be defined in
/nix/example/devshells.nix and our toolchain will be defined in
/nix/example/toolchain.nix. The devshells type should be self-explanatory at
this point: this is where we will define the development shells available in our
project. The functions type is a bit unique and serves as a general type for
storing cell-specific Nix expressions. In this case, we're creating a
toolchain cell block that will contain a Nix expression that evaluates to the
latest version of the Rust toolchain.
In addition to adding the above two cell blocks, we've also expanded the second
argument to our growOn function so that the development shells we define are
available under the devShells flake output. This provides compatibility with
the Nix CLI and anyone using nix flake show to inspect the repository.
Defining our Devshell
We're going to define a single development shell in
/nix/example/devshells.nix:
# Just like we place buildables in `apps.nix`, it's standard to place our
# development shells in a `devshells.nix` cell block.
#
# This cell block is used to define the development shells that are available to
# consumers of our repository. If you're not familiar with the idea of a
# development shell, it's essentially a self-contained environment that can be
# configured to provide all the tools and dependencies needed to work on our
# project. It solves the vital problem of, "works on my machine."
{ inputs
, cell
}:
let
  inherit (inputs) nixpkgs std;
  l = nixpkgs.lib // builtins;
in
# Here we map an attribute set to the `std.std.lib.mkShell` function.
  # This is a small wrapper around the numtide/devshell `mkShell` function and
  # provides integration with `nixago`, which we'll see in a later part. The
  # result of this map is a attribute set where the value is a proper
  # development shell derivation.
l.mapAttrs (_: std.std.lib.mkShell) {
  # This is our only development shell, so we name it "default". The
  # numtide/devshell `mkShell` function uses modules, so the `{ ... }` here is
  # simply boilerplate.
  default = { ... }: {
    # The structure of this attribute set is defined here:
    # https://github.com/numtide/devshell/tree/master/modules
    #
    # Familiarity with the devshell system is likely valuable here, but it's
    # intuitive enough to understand without it.

    # This is the name of our development shell. When a user enters the shell,
    # a MOTD style heading is printed to stdout with this name.
    name = "example devshell";

    # Since we're using modules here, we can import other modules into our
    # final configuration. In this case, we import the `std` default development
    # shell profile which will, among other things, automatically include the
    # `std` TUI in our environment.
    imports = [ std.std.devshellProfiles.default ];

    # This is a list of packages that will be available in our development
    # environment. In this case, we're pulling in the rust toolchain from our
    # `toolchains` cell block.
    #
    # Notice the magic here. We can extrapolate the rust toolchain to a separate
    # cell block and then access it from `cell.toolchain`. This is a direct
    # benefit from standardizing our project!
    packages = [
      cell.toolchain.rust.stable.latest.default
    ];

    # This is a list of "commands" that will be available inside our development
    # environment. One of the features of numtide/devshell is that it provides
    # a `menu` command that will list all of the commands we define below. This
    # allows consumers to easily understand what development tasks are available
    # to them from the CLI. For example, running `tests` in side of our shell
    # will in turn call `cargo test` for us.
    commands = [
      {
        name = "tests";
        command = "cargo test";
        help = "run the unit tests";
        category = "Testing";
      }
    ];
  };
}
There appears to be a lot going on here, but it's fairly straightforward to
follow. First of all, we have our typical cell block structure at the top of the
file with the inputs and cell arguments. We do some simple setup in the
let statement and then we perform a map, utilizing std.std.lib.mkShell as
the function. The mkShell function offered by std is a wrapper around the
mkShell function provided by devshell. The primary benefit of
using the wrapper will be revealed in a future chapter, but for now, it's simple
enough to understand that it does the work of making the development shell
derivation that is consumed by Nix.
The mkShell function accepts a single parameter, a module
function. In this case, we don't need access to any of the
standard module arguments, so we can compress them with ellipses.
The available options for the module are defined here. The most common options are discussed below:
name: The name of the development shell. Appears in the MOTD.packages: A list of Nix packages that should be made available in the development shell.commands: A list of custom commands that should be made available in the development shell. The suboptions can be found here.
In the example above, we define a single development shell (default), give it
a name, add the Rust toolchain from our toolchain cell block (discussed
below), and provide a single custom command which runs our unit tests using
cargo.
It's worth noticing the utility of this expression:
{
    # ...
    packages = [
      cell.toolchain.rust.stable.latest.default
    ];
    # ...
}
As mentioned in chapter 1, the cell argument allows us to access all the cell
blocks available within our local cell. In this case, we utilize it to access
the toolchain cell block to bring our Rust toolchain expression into the scope
of the development shell. This is a neat trick that std allows us to do!
The remaining imports attribute is a Nix module feature that
allows importing additional modules into our final configuration. Here we import
a development shell profile from the std library which provides us with the
following:
- Includes the
stdbinary into our development environment for us - Provides a customized MOTD specific to
std
This isn't strictly necessary, and can certainly be omitted.
Defining our Toolchain
The last piece we're missing is defining our toolchain cell block. We'll do this
in /nix/example/toolchain.nix:
# This cell block is less idiomatic and is geared towards customizing our
# standardized environment by making an overlayed version of the rust toolchain
# available to our cell. This is the benefit of having some flexibility with how
# we organize our cells and cell blocks.
{ inputs
, cell
}:
{
  # `std` does not support global overlays, so we use `nixpkgs.extend` to make
  # a local overlay.
  # See: https://github.com/divnix/std/issues/117
  rust = (inputs.nixpkgs.extend inputs.rust-overlay.overlays.default).rust-bin;
}
A theme should start appearing now with the structure of cell blocks. In this
case, we're given a little freedom with the structure of what it produces. The
goal is to create an expression that evaluates to the latest stable version of
the Rust toolchain using the rust-overlay flake we imported in our
flake.nix.
As the comments make note of, std discourages applying overlays globally and
instead recommends defining a local instance of nixpkgs and using the extend
function to apply overlays. This is exactly what we do here, with the result
being we can access the Rust toolchain via rust.stable.latest.default.
Integrating direnv
The last thing we'll add to improve our newly created development environment is
integration with direnv. This utility provides a critical feature in improving
the experience with Nix development shells. In short, direnv will
automatically evaluate (once explicitly allowed on a per-file basis) any
.envrc files found at the root of a directory (and by nature, all parent
directories).
What these .envrc files do is dependent on their contents. They can be as
basic or advanced as desired. In the case of Nix, one can use nix-direnv to
automatically enter into a Nix development shell. This is so incredibly common
across the Nix ecosystem that you'll almost always see .envrc files in
Nix-infused repositories.
The std framework provides some additional magic on top of the standard
direnv experience which will not only allow us to select which of our defined
development shells we want to enter automatically but also apply file watchers
to our definitions to automatically reload our environment when the files
change. To accomplish this, we'll add the following to a .envrc file at the
root of our repository:
#! /bin/sh
# This file is sourced by direnv when entering the directory. The content below
# is pulled from: https://divnix.github.io/std/guides/envrc.html

source "$(
    nix eval \
        --no-update-lock-file \
        --no-write-lock-file \
        --no-warn-dirty \
        --accept-flake-config \
        .#__std.direnv_lib 2>/dev/null
)"

# Here we can select which development environment is used by `direnv`. We only
# have one in this case, and we called it default.
# See: /nix/std-example/devshells.nix).
use std nix //example/devshells:default
With this, and direnv installed/configured, we can cd into our repository
root and be automatically dropped into our newly minted development shell:
$ direnv allow
direnv: loading ~/code/nix/std-book-example/.envrc
direnv: using std nix //example/devshells:default
direnv: Watching: nix/example/devshells.nix

🔨 Welcome to example devshell 🔨

To autocomplete 'std' in bash, zsh, oil: source <(std _carapace)
More shells: https://rsteube.github.io/carapace/carapace/gen/hiddenSubcommand.html


[Testing]

  tests - run the unit tests

[general commands]

  menu  - prints this menu
  std   - A tui for projects that conform to Standard

direnv: export +DEVSHELL_DIR +NIXPKGS_PATH +PRJ_DATA_DIR +PRJ_ROOT ~PATH ~XDG_DATA_DIRS
As expected, std is available and we can even see our example tests command
in the menu. Let's give it a try:
$ tests
Finished test [unoptimized + debuginfo] target(s) in 0.04s
     Running unittests src/main.rs (target/debug/deps/example-965805a32576c369)

running 1 test
test test_say_hello ... ok

test result: ok. 1 passed; 0 failed; 0 ignored; 0 measured; 0 filtered out; finished in 0.00s
Review
Let's take stock of what we've been afforded with these changes.
- We took advantage of
std's integration withnumtide/devshelland added a default development shell to our repository - We created a nice MOTD for our repository, welcoming contributors and making
them aware of
stdand our custom commands - We added a custom command for running our tests with
cargo - We provided contributors with the latest version of the Rust toolchain
Finally, to wrap things with a bow, we integrated direnv to automagically load
us into our new development shell when we cd into our repository root. This is
no small feat! The best part is we stayed within std the whole time and yet
were still afforded all of these quality-of-life improvements.
The organizational structure provided by std is a huge boon to productivity,
but so are the quality-of-life improvements. Contributing to our humble example
project just became much easier with development shells, and we'll continue this
theme of improvement in the next chapter.
Managing Configurations
In the last chapter, we saw how the integration with numtide/devshell allows
us to easily integrate feature-rich development environments into our
repository. These allow contributors to quickly get up to speed with the tools
that are required to contribute to our repository and provide a lot towards
solving the "works on my machine" problem.
In this chapter, we're going to look at another integration: Nixago.
An Introduction to Nixago
Modern repositories rely on a lot of modern tools for providing things like linting, auditing, formatting, compiling, releasing, etc. Sometimes one tool can tackle multiple tasks, but for the most part we often end up needing several to cover the whole spectrum. To make matters worse, many of these tools bring with them their own configuration with little room for interoperability between them.
Nixago was designed to address this problem by doing two things:
- Bringing configuration data back into Nix
- Dynamically generating configuration files
Managing Configurations with Nix
The first benefit that Nixago brings is it allows us to generate our
configuration files using pure Nix code. This allows us to do many interesting
things, especially when our entire repository is already wired up by Nix using
std.
For example, we can apply convenient transformations to data structures or bring
in data from other parts of the repository to inform how a specific tool should
be configured. The std integration for conform does
this by automatically configuring the conventional commit policy using the cell
names as subjects. This is just one example of many possibilities that can be
put together using std's Nixago integration.
Dynamic Generation
The second benefit that Nixago brings is that configuration files are
dynamically generated. When a user first enters into a development shell that
has been configured with Nixago support, it will automatically run its
pre-generated shell hooks which will generate the required configuration files
and write them to the repository directory. Most of the time, these files are
simply symlinks that point back to the Nix store (and are automatically added to
.gitignore). However, an option can be specified which switches these to hard
copies which can then be committed into revision control (to support CI for
example).
Integration
The std framework makes it easy to integrate Nixago into our repository. It
provides a cell block type which provides direct integration
with the devshell cell block. This is required, because Nixago relies on shell
hooks to generate files, and the devshell integration will ensure the hooks
are run when we enter the environment.
In the remainder of this chapter, we'll work on setting up the Nixago integration to configure a few common tools that will prove useful to our development experience.
Adding a Nixago Block
As with any cell block, we'll first add it to our flake.nix:
{
  inputs.std.url = "github:divnix/std";
  inputs.nixpkgs.url = "nixpkgs";
  inputs.rust-overlay.url = "github:oxalica/rust-overlay";

  outputs = { std, ... } @ inputs:
    std.growOn
      {
        inherit inputs;
        cellsFrom = ./nix;
        cellBlocks = [
          (std.blockTypes.runnables "apps")
          (std.blockTypes.devshells "devshells")
          (std.blockTypes.functions "toolchain")

          # The `nixago` type is used for holding Nixago configurations. We name
          # it configs to remove some ambuiguity.
          (std.blockTypes.nixago "configs")
        ];
      }
      {
        packages = std.harvest inputs.self [ [ "example" "apps" ] ];
        devShells = std.harvest inputs.self [ "example" "devshells" ];
      };
}
This is a fairly trivial addition, the only thing worth noting is that we call
it configs to reduce ambiguity because most people are not aware of what
Nixago does.
Defining the Block
The cell block is where the meat of our configuration lies. We'll add the
following to /cells/example/configs.nix:
# This cell block holds our Nixago expressions for generating configuration
# files for the various tools we want to configure in our repository. We title
# it `configs.nix` because Nixago is less well-known and this name points to the
# purpose of the cell block.
#
# For an introduction to Nixago, see here:
# https://nix-community.github.io/nixago/
{ inputs
, cell
}:
let
  inherit (inputs) nixpkgs std;
  l = nixpkgs.lib // builtins;
in
# The structure is an attribute set where the value is an attribute set that
  # is ultimately passed to the `make`[1] function from Nixago. The available
  # arguments for the `make` function can be seen here[2].
  #
  # `std` allows us to pass additional pass-through arguments that can influence
  # the behavior of our development shells. This is primarily used so we can
  # include the necessary packages for the tools we want to configure into the
  # development environment.
  #
  # Additionally, `std` automatically includes any shell hooks generated by Nixago
  # into the appropriate `devshell` option. This is ultimately what allows Nixago
  # to generate the configurations when we enter the development shell.
  #
  # [1]: https://github.com/nix-community/nixago/blob/master/lib/make.nix
  # [2]: https://github.com/nix-community/nixago/blob/master/modules/request.nix
{
  # The `std` framework ships with some "pre-configured" services that we can
  # import and use here. For a list of all of them, see here[1]. These are setup
  # such that we can use a functor to dynamically extend them with additional
  # attributes or overrides. This is why they appear to look like functions.
  #
  # In most cases, when using these pre-configured services, we only need to be
  # concerned with setting the `configData` attribute. This is what ultimately
  # ends up in the generated configuration file and is dependent on what tool
  # is being configured.
  #
  # Conform[2] is a tool that allows us to enforce policies on our commit
  # messages. We configure it here to only allow commits that follow the
  # Conventional Commits specification[3].
  #
  # [1]: https://github.com/divnix/std/tree/main/cells/std/nixago
  # [2]: https://github.com/siderolabs/conform
  # [3]: https://www.conventionalcommits.org/en/v1.0.0/
  conform = std.std.nixago.conform {
    # The configuration of Conform is a bit different than the expected file
    # format. This is to prevent excessive nested attribute sets. In this case,
    # we only need to specify either a `commit` or `license` parent attribute
    # and then the child contents match what is specified in the Conform README.
    configData = {
      commit = {
        header = { length = 89; };
        conventional = {
          # Only allow these types of conventional commits (inspired by Angular)
          types = [
            "build"
            "chore"
            "ci"
            "docs"
            "feat"
            "fix"
            "perf"
            "refactor"
            "style"
            "test"
          ];
        };
      };
    };
  };
  # Lefthook is a pre-commit hook manager.
  lefthook = std.std.nixago.lefthook {
    configData = {
      commit-msg = {
        commands = {
          # Runs conform on commit-msg hook to ensure commit messages are
          # compliant.
          conform = {
            run = "${nixpkgs.conform}/bin/conform enforce --commit-msg-file {1}";
          };
        };
      };
      pre-commit = {
        commands = {
          # Runs treefmt on pre-commit hook to ensure checked-in source code is
          # properly formatted.
          treefmt = {
            run = "${nixpkgs.treefmt}/bin/treefmt {staged_files}";
          };
        };
      };
    };
  };
  # Prettier is a multi-language code formatter.
  prettier = std.lib.dev.mkNixago {
    # We mainly use it here to format the Markdown in our README.
    configData = {
      printWidth = 80;
      proseWrap = "always";
    };
    output = ".prettierrc";
    format = "json";
  };
  # Treefmt is an aggregator for source code formatters. Our codebase has
  # markdown, Nix, and Rust, so we configure a formatter for each.
  treefmt = std.std.nixago.treefmt {
    configData = {
      formatter = {
        nix = {
          command = "nixpkgs-fmt";
          includes = [ "*.nix" ];
        };
        prettier = {
          command = "prettier";
          options = [ "--write" ];
          includes = [ "*.md" ];
        };
        rustfmt = {
          command = "rustfmt";
          options = [ "--edition" "2021" ];
          includes = [ "*.rs" ];
        };
      };
    };
    # This is the pass-through feature where we can pass attributes to devshell.
    # In this case, we're asking devshell to include the `nixpkgs-fmt` and
    # `prettier` packages in the development environment. The `rustfmt` package
    # is already included within the Rust toolchain (see toolchain.nix).
    packages = [
      nixpkgs.nixpkgs-fmt
      nixpkgs.nodePackages.prettier
    ];
  };
}
This is significantly more code, but a majority of it is the actual configuration data we're using to generate our files.
The output structure of the cell block is an attribute set where the value is another attribute set that must conform to two things:
- The module structure enforced by Nixago
- Any additional pass-through data, which in this case means data intended for
devshell
Module Structure
The module structure is fairly easy to grasp and a quick overview can be seen in the Nixago quick start guide. The three main options are:
configData: The raw configuration data used to generate the output fileoutput: The name of the output fileformat: The format of the output file
There are a few additional advanced options, but the above three options are enough to cover a majority of use cases.
The std framework provides several "pre-configured" expressions that we can
make use of to lessen the verbosity of our cell block. These expressions can be
found here. Attentive readers will notice that it appears we are
"calling" these expressions as if they were functions. This is because they use
functors to allow dynamically merging/overriding the arguments passed to them.
So in many of the examples seen in our code, we're essentially extending the
existing structure given to us by std and adding our raw configuration data to
it. It's not strictly necessary to do this, we could just define the whole
structure ourselves, but using these shortcuts helps us type a bit less.
Pass-Through
To get our Nixago configurations to generate, we must pass off the shell hooks
to devshell. We'll tackle this part soon, but the important thing to
understand is that these data structures will eventually pass through to
devshell. What this means is that we can add additional attributes to our data
structure that will in turn provide additional configuration to devshell.
If you examine the treefmt configuration in our example, you'll see that it
also includes the packages attribute which is not a part of the Nixago module
structure. Nixago will ignore this attribute, but when devshell sees it, it
will automatically include those packages in our environment. This allows us to
define our dependency as close to our configuration as possible while also
ensuring our configuration works as expected (i.e. treefmt needs prettier to
work as expected).
The Tools
The remainder of the code is responsible for configuring the actual tools we'll be using. Each of these will be briefly discussed below.
Conform
The conform tool allows us to specify policies that will be enforced against our commits. This is an invaluable tool in open-source projects and can help bring uniformity to commit messages and improve the generation of change logs.
In our case, we're specifying that commit message headers can be no longer than 89 characters and that the message itself must conform (ha!) to the conventional commit specification. Additionally, the type section of the conventional commit header must be one of the items given in the list (the list itself is inspired by the Angular project).
Lefthook
The lefthook tool automatically manages git hooks for us. These are often referred to as pre-commit hooks and have been a best practice in many projects for reducing the feedback cycle when developing against a project.
In our case, we use lefthook to enforce our commit messages using the policy
specified with conform. Additionally, we automatically call treefmt on the
files being checked in to ensure that all of our revision-controlled source code
is properly formatted.
Prettier
The prettier tool is a general-purpose code formatter that supports several languages.
In our case, we're simply using it to format our markdown files. The primary benefit is that it can help enforce the 80-character line limit being imposed across all of our code.
Treefmt
The treefmt tool acts as an aggregator for code formatters. Instead of having
to call each formatter individually, we instruct treefmt which formatters we
want to run on which types of files and it will handle the rest for us.
In our case, we're adding formatters for the three primary languages that exist in our repository: Rust, Nix, and Markdown.
Devshell Integration
As mentioned earlier, the last thing we need to do is to inform our devshell
configuration about our newly added Nixago configurations. We'll add the
following to our /nix/example/devshells.nix file:
{ inputs
, cell
}:
let
  inherit (inputs) nixpkgs std;
  l = nixpkgs.lib // builtins;
in
l.mapAttrs (_: std.std.lib.mkShell) {
  default = { ... }: {
    # ...

    # Nixago uses shell hooks for generating configuration files. In order for
    # that to work, devshell must add them to its own configuration. To ensure
    # this happens, we specify the configurations we would like generated using
    # the `nixago` attribute.
    nixago = [
      cell.configs.conform
      cell.configs.lefthook
      cell.configs.prettier
      cell.configs.treefmt
    ];

    # ...
  };
}
With this complete, we can now reload our development shell and watch Nixago generate all of our configuration files for us:
$ direnv reload
# ...
nixago: updating repositoriy files
nixago: '.conform.yaml' link updated
nixago: '.conform.yaml' added to .gitignore
nixago: 'lefthook.yaml' link updated
nixago: 'lefthook.yaml' added to .gitignore
nixago: '.prettierrc' link updated
nixago: '.prettierrc' added to .gitignore
nixago: 'treefmt.toml' link updated
nixago: 'treefmt.toml' added to .gitignore
Review
Many of the improvements we have gained in this chapter have come from the tools we've now employed to improve our overall development experience; however, don't miss how easy it was to automatically have these tools:
- Dynamically configured using Nix
- Configuration files automatically managed by Nixago.
- Binaries automatically included in the shell environment
The integration between std, Nixago, and devshell has afforded us a great
degree of flexibility for bringing in and configuring tools that will help
improve our experience. The organizational model provided by std serves as the
glue that binds these all together and allows our repository to continue to add
useful tools without the risk of becoming too hard to maintain or reproduce.